 Merry Christmas! I hope everyone spends time with family, and reflects on the true meaning of the season.
Saturday, December 25, 2010
Merry Christmas
Merry Christmas! I hope everyone spends time with family, and reflects on the true meaning of the season.
Monday, December 20, 2010
Wednesday, December 15, 2010
Christmas Tree

This was big year for changes when it came to our Christmas tree.
First off, we went with a real tree. Jeff & I both were raised with artificial trees, and we continued that when we married. We both wanted to try a real tree, so we did. Now we can say we've done it,and I'm pretty sure we will be going back to our artificial tree.
Besides the messy needles and constant watering, the top of the tree is very crooked, I can't straighten it no matter what I try.
However, it is our first real tree, so it stays for this year.


The other big change are the colored lights. Again Jeff & I grew up with colored lights, but I love the beauty and simplicity of white lights, so we have had white lights. Rileigh has asked for colored lights for the past three years, so this year she got her wish.
Rileigh always puts the star on top of the tree because she does most of the decorating.

This year we also hung lots of ornaments from when I was a child - the kids liked the "new" additions.
Every year the kids get to pick out a new ornament for the tree, so we will do that this weekend.

Linking up with A Glimpse Inside "Show Me Your Tree"
Thursday, December 9, 2010
Advent wreath
Cheri's recent post reminded me that so often the true meaning of Christmas is lost on commercial ventures.
To that end, I really want Rileigh & Maddox to understand what Christmas is about (no, not presents).
So we added the good deeds in our Advent calendar. Rileigh & Maddox loved them! They liked seeing what the good deed was, and then that there were more to come. Their gifts to Jesus were really sweet too.
I also made out Advent wreath. "Bear" from work helped me out again, he cut the holes for the candles. I wrapped a green floral styrofoam wreath form (Dollar Tree) with glittery green ribbon (Walmart) using hot glue to tack it down. I only managed to burn myself once on this - yea for me :)
I glued the wrapped wreath to a white paper plate and hot glued a single glass tapered candle holder in the center for the white candle.


To help decorate it, I will add some evergreen cuttings. I hope this will help remind Jeff & I to slow down and think about what the Christmas spirit really means, and help build Rileigh & Maddox's excitement for the true meaning of Christmas.
Wednesday, December 8, 2010
Decorative candles
Another great idea from Not So Idle Hands
This is a great idea for an easy hostess gift, or giveaway at your Christmas party (that's what I am doing with mine)
You will need white tissue paper, votive candles, a mini hole punch, a heat gun, a pretzel bag, ribbon and decorative paper.

Start with white tissue paper. Stamp some festive images in different colors. The stamped image should fit on the face of the candle.

Cut out the stamped image. I used a circle squeeze punch (the trick to using the punch is to put a piece of paper behind the tissue paper).
Next punch a hole in the middle of the image. Place the image on top of the candle (the wick goes through the hole). Next grab your heat gun. Melt the image into the wax. (Really you are heating up the wax below and the image will dry in the wax.)
After you do 5 candles they fit nicely into a pretzel bag. There are some great tags to put with the candles here, because they are for decorative use only. I mounted the tags on some scalloped circles, punched a hole and used the ribbon to tie the tag to the bag. Viola - a pretty gift!

Monday, December 6, 2010
More subway art
Since the 1st one went well, I decided to make one for the kids.
These pieces of wood are from Walmart - a little more than HL, but they are sturdy and since they will hang in the kids' rooms they need to be. (I did see smaller pieces at Michaels for under $2 - maybe for the next project)
Paint the wood, then cut the words out with vinyl - and use transfer tape to assemble. When you are all done spray with a glossy clear coat.
Pink for Rileigh, light blue for Maddox. The hard part was coming up with the right words. I didn't want to use the same words. I used three different fonts on Rileigh's and 4 colors of vinyl. For Maddox I went with bold print fonts and also 4 colors.


The kids love them! (Yay)
Sunday, December 5, 2010
The rest of Mom's cards
The last 3 styles of cards for Mom
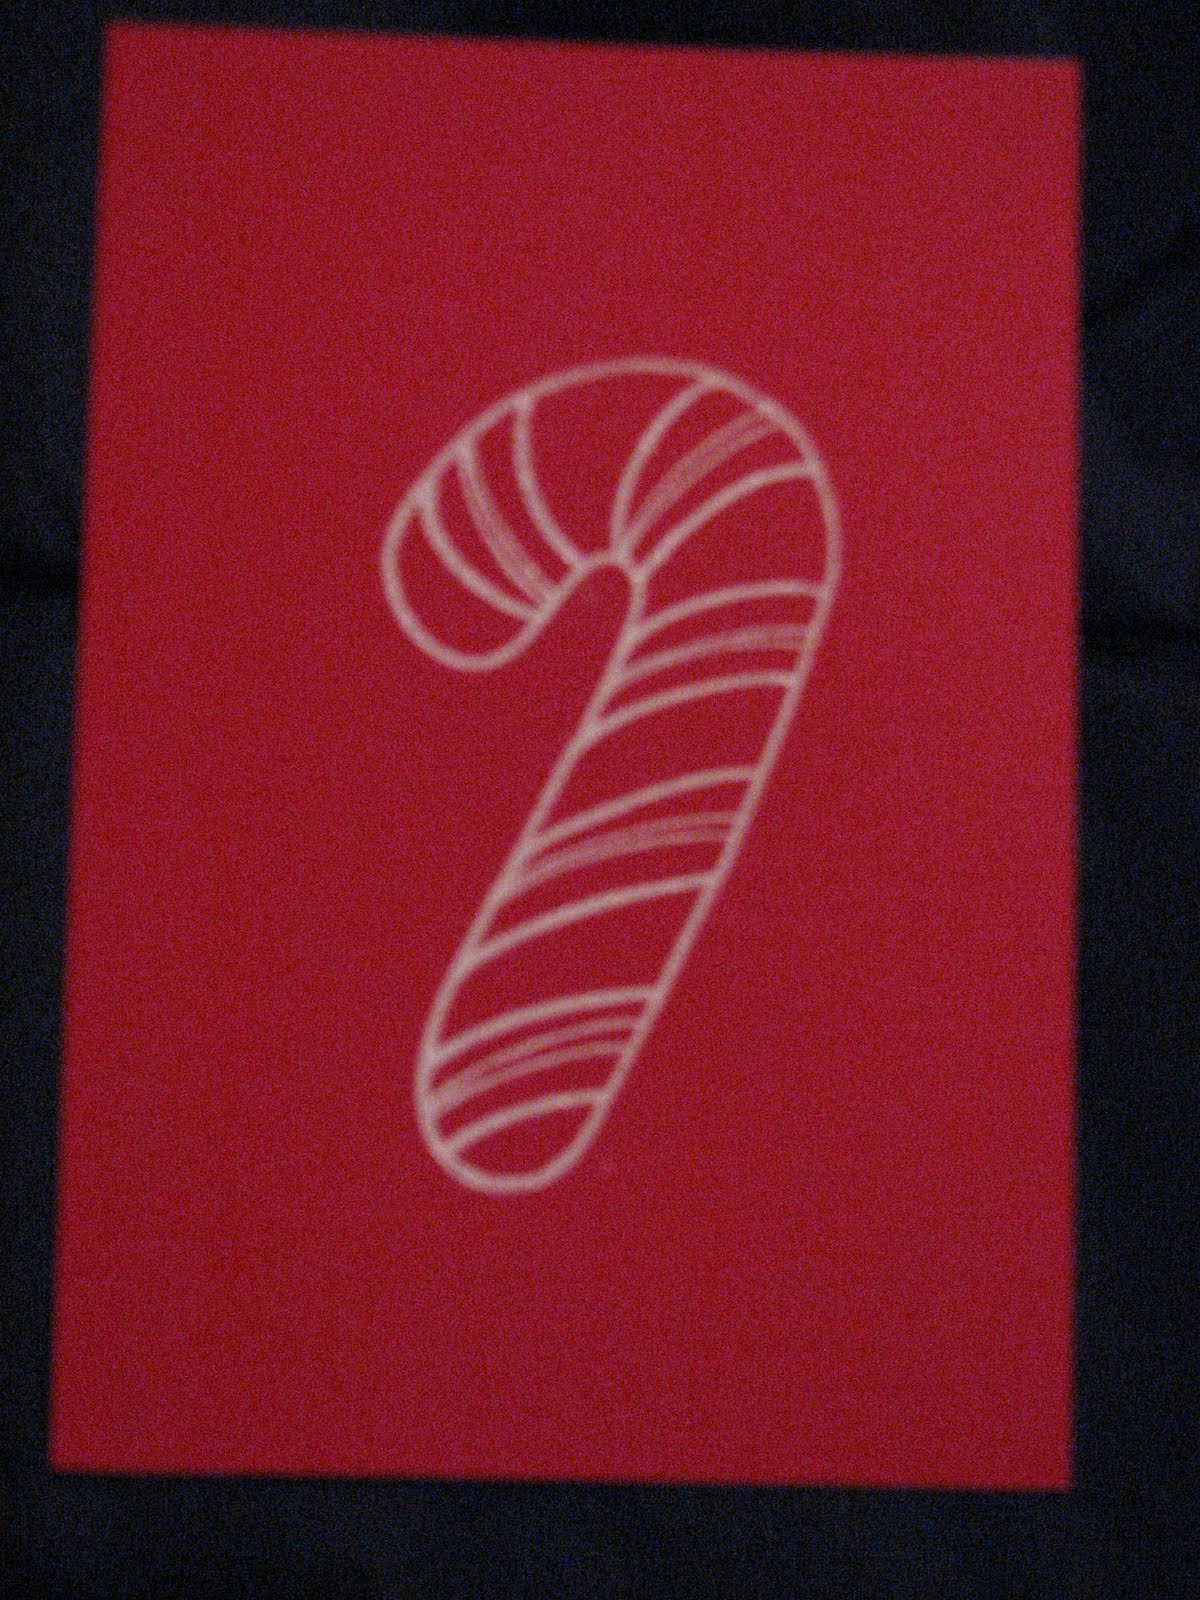
This was a very simple card - I like the red & white contrast.
Gina K red paper - it is very vibrant. I'm not a big stamper. I thought it was because I couldn't get the hang of it and it's messy. But the more I read and try, and use better quality inks and stamps the more I keep coming back to try my hand again. I stamped the candy cane and completed it with white embossing powder.
I used SCAL to cut this image. Mounted on blue cardstock. I added a two stars and gold stickled the top one.

Light blue Core'dinations cardstock ran through the Cuttlebug snowflake embossing folder and sanded. I cut the blue-grey scalloped circle out with a nestie. I colored the image with Copics and added a little Stickles.

Christmas pots
I decided that I was not going to spend more than $5 on my winter pots this year. All of the greens are from our yard and neighbors. The red twig sticks are such a great accompaniment to the displays. My grand total is $3.23! for the bows on the window boxes. I made them up as the temperature was dropping so I added water and within a few hours they had frozen.
The best part about them freezing is I don't go back to adjust and rearrange the sprigs, because once they're in, they are in. Yes you can change them, but that involves a lot more work. So I say que sera, sera

The best part about them freezing is I don't go back to adjust and rearrange the sprigs, because once they're in, they are in. Yes you can change them, but that involves a lot more work. So I say que sera, sera

Nativity Blocks

Thank you Cheri. Your post about the Nativity blocks was so inspiring, that I made my own. I used the link Cheri offered for images - mostly because I wanted the blocks to be finished before the kids left this weekend. They both really liked them - Rileigh was under the weather this weekend so she didn't play with them, but Maddox couldn't wait for the Mod Podge to try so he could set them up.
Thanks Cheri for helping to bring a little extra CHRISTmas to my house this year!
First try at Subway art
I know Subway art is a new craze, and I have been wanting to try it. So instead of working on Christmas presents or vacuuming - I cut out some festive words with SCAL on some different colors of vinyl.
I picked up the piece of wood at HL for $2.99 (with a 40% off coupon) and painted it Evergreen. After it dried, I added my words.
The next morning I saw a few small gaps, and added a few more words. As a finishing touch I may spray it with a clear coat.

I am really happy with how this turned out. So much so that I made two more...
Saturday, December 4, 2010
Mom's Christmas Cards
Here are 3 styles of the cards I made for my Mom this year.
Brown cardstock run through a Cuttlebug folder. The wreath is from Celebrate with Flourish. (I really like this new cart, thanks DH!)

Red cardstock - reindeer cut from Christmas Cheer. DH stickled the nose and glued on the hooves, antlers, and googly eyes. Added some ribbon at the bottom to finish it off.

Light blue cardstock ran through the Cuttlebug - Snowflake folder. The "Charlie Brown" tree is from Jolly Holidays. I stickled the ornaments and painted some Angel Wing Shimmerz on the snow at the base of the tree.

Friday, December 3, 2010
Christmas Card Holder
The idea/inspiration/credit for this idea came from here. Another blog full of amazing ideas.

My friend "Bear" in the metal shop at work fabricated the metal strips. I used Mod Podge(!) for the first time - and have to say "what have I been afraid of?" That stuff is awesome! I used Mod Podge to glue down the decorative paper and then another coat or two on top to seal them. I used 3M adhesive strips to mount them to the wall.
The magnets are homemade too! My wonderful DH went to HL and picked up large "marbles" and magnets (pack of 10 for $2.99-magnet strength 10) and adhesive M3000. Grab some scrap decorative paper. A dot of Mod Podge on the flat side of the marble and stick it to the paper. Once the paper dries, use your Exacto knife to trim around the marble (it doesn't have to be pretty). A coat on the other side of the paper to seal it. After that dries, put a dot of M3000 on the paper and stick the magnet to it. After it dries, you have a great, strong magnet. Word of advice - these magnets a re strong, so don't let them get too close to one another when drying. My magnets did travel off their designated spot on more than one occasion.


Thursday, December 2, 2010
Friday, November 19, 2010
Another Thanksgiving Card

This is Templeton turkey (I can't remember where I got this digi) he is perfect for Thanksgiving cards.
Colored with copics, I used a gel pen color: Silver Star Star for the buckles on the hat and shoes.
The paper is all leftover scraps, with a little ribbon added for fun.
I re-found my chalk so I used a little of that around the nestie.
Rileigh was watching me blog tonight and announced that tomorrow she will be blogging here - so we'll see how the 7.5 year old fares.
Sunday, November 7, 2010
TMITA Challenge

Well after many months, I made a card for the TMITA challenge. The challenge was to make a Thank you or Thanksgiving card. I used the Paper Cupcakes image "Autumn Splendor".
Colored with Copics, cut out with with a nestie and mounted on green paper. The dp is Debbie Mumm with a strip of Bazzil scrap paper on the left. The ribbon is from my stash.
Glad to be back band crafting. I've actually been crafting a lot, but not taking the time to post. I will try to remedy that in the coming days. Thanks for looking!
Sunday, October 24, 2010
Trick or tweet

I can't remember where I saw this idea, so I apologize for not giving credit. I cut the chick from Stretch You Imagination and the bats and witch's hat are SCAL. The best part about this card is DH helped put it together, I love when he helps me craft. Thanks Angel!
Saturday, October 23, 2010
Wednesday, October 20, 2010
Another Halloween card

Sorry about the blurry pix. 3 white stamped skulls embossed, and then DANGER stamped in platinum and embossed. SImple card - but should have big impact, I think Maddox will like it.
Thursday, October 14, 2010
Halloween card

This may be my favorite Halloween card. I totally scrap lifted it from a woman's design at Paper Source, but she told me how to make it so I think it's okay. I used SCAL to cut "grass" for the hair and the MS drippy goo punch for eyebrows. The eyes are metal-rimmed paper key tags (such a smart idea), the teeth were typed then a semicircle cut for the mouth. Hope Maddox likes Frankenstein
Iron-on vinyl t's
l-o-v-i-n-g heat vinyl right now. Maddox is in Scouts and has shirts, but with Rileigh, Jeff & I volunteering we thought we should look like we belong. The white T was made for Rileigh. Then I ordered some t's for the 4 of us (only took pix of 3 t's) The kids love them, and I like when we all match - so win, win


Halloween Invite

Lots of MS punches here - the leaf border punch and drippy goo on the orange. A MS punch with the bats and "EEK" on the left. I stamped a white ghost to finish the front.
On the back I used the MS spiderweb border punch on the top and mice and gravestones on the bottom. A Fiskars squeeze punch for the ghosts and EK Success spider on some black glittery punch. I stamped a jack-o-lantern and "beware" for a little hint of spooky.
The kids loved them, and they will be great to scrap.
So sorry
I'm sorry blog world - it has been too long. I actually hae been crafting, just not sharing.
I promise to remedy that tonight - I have the kids' Halloween party invites and some Halloween cards I finished.
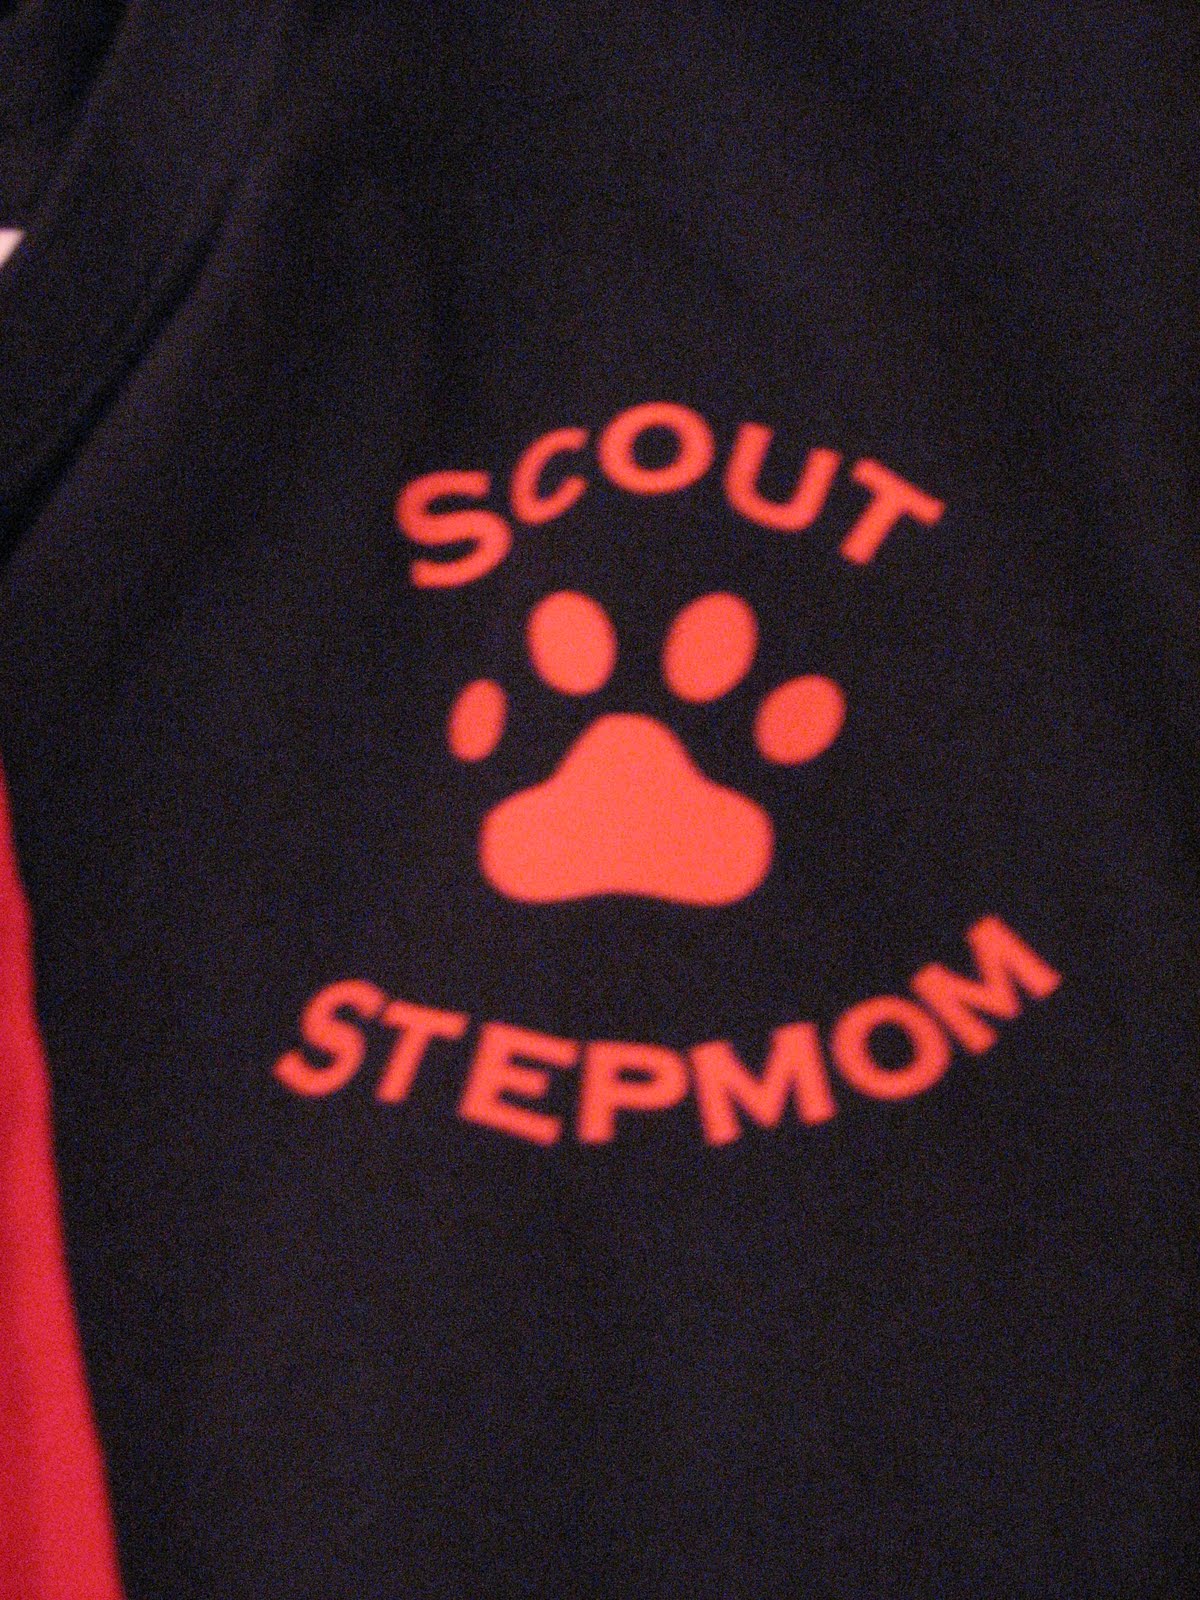
Also Boy Scout shirts - lil' dude is a Tiger Scout, and since his sister isn't in Brownies this year Jeff & I did not want her to feel excluded, expecially since she goes with to lots of the activities, and she is a super popcorn seller. I cut out "Scouting Sister" in heat-vinyl and applied it to a shirt. She loved it! So I followed up with t-shirts for Jeff & I.
I have even been working on some LO's, so I will will try to share a lot over the next couple of days.
I promise to remedy that tonight - I have the kids' Halloween party invites and some Halloween cards I finished.
Also Boy Scout shirts - lil' dude is a Tiger Scout, and since his sister isn't in Brownies this year Jeff & I did not want her to feel excluded, expecially since she goes with to lots of the activities, and she is a super popcorn seller. I cut out "Scouting Sister" in heat-vinyl and applied it to a shirt. She loved it! So I followed up with t-shirts for Jeff & I.
I have even been working on some LO's, so I will will try to share a lot over the next couple of days.
Friday, July 30, 2010
Look at me!
OMG - Cheri over at I am Momma linked my 4th of July shirts to her Roared page. Wow thanks Cheri!
Sunday, July 25, 2010
Cheesecake

Jeff & I made cheesecake from this recipe for Matt & Beth's housewarming party. Got rave reviews. It was easy to make, and we were able to garnish with some blueberries!
Friday, July 23, 2010
Shaklee Products
I have been seeing a lot of info about Shaklee lately, but Bonnie's post speaks volumes. Her pictures show the results of the products, and I am going to take the plunge. The allure of eco-friendly products and a checmical free house sealed the deal. Check out her site, her pix, the products and then try it for yourself!
Monday, July 12, 2010


Thursday, July 8, 2010
4th of July shirts
The Guys

All the kids - and their matching t's
My family - even Lila was festive
My favorite angels


All the kids - and their matching t's

My family - even Lila was festive

My favorite angels

Monday, June 28, 2010
4th of July wreath
 The inspiration for this wreath came from here. Amanda has tons of great ideas. The grapevine wreath is from Dollar Tree. The ribbon is from Michaels (all on sale 30% & 50% off.
Silhoutte Giveaway
Well blog world, I am sure by now you are aware that the Silhoutte is out there, and apparently the newest amazing must have. To help us all get one, there is the amazing opportunity to win one here. With any luck at all I will be the lucky winner. :) Then I will have all sorts of new fantastical creations to share
Another weekday afternoon, and instead of working I am lurking in blog world. Shhh! Welcome back Pam - you know your posts make my day. I decided to check out some of Pam's favorite blogs, and have enjoyed myself. I really like this one and have to agree that to grow your blog you need to visit lots and post a lot (I am pretty good at visiting lots of blogs, it's the posting aspect I am deficient on - which is terrible of me, I should applaud all the people who inspire me, and who make me laugh). Amanda has some great ideas for keeping up with blogging without distancing yourself from your family (btw love Michael Byrd's bathing suit). Also I am enjoying looking here.
Thanks again Pam, and I am glad to see you posting again!
Thanks again Pam, and I am glad to see you posting again!
Thursday, June 24, 2010

Wednesday, June 23, 2010
Painted T

I have a new favorite blog, check it out Cheri is very creative, and has so many great projects. She has great instructions too! I copied her Captain America shirt idea for Maddox
Then I used the same idea for shirts for Jeff & I


Rileigh's should be finished tomorrow - then I will show that one off
Thursday, May 20, 2010
Maddox's Wall Hangings


 Let me preface this post by apologizing for the picture quality. It is late and I am rushing, so the pix are blurry. I may try to retake them - but I wanted to hang them and post them tonight. Maddox is going to be so excited. Pam http://bibbidi-bobbidi-beautiful.blogspot.com/ - thank you again for this amazing idea, you are such an inspiration. Dollar Store foam board + 3 pieces of dp + tape + Indie Art = instant wall hangings. Hugs & kisses Lil' Dude, Love Sweetie :)
Subscribe to:
Comments (Atom)